Quick note: The old thread contains the exact same tutorial, however the image links are dead. A vBulletin error prevented me from updating my original post, so here is the same tutorial with fixed images.
Really, I don't know why I'm writing this tutorial. I guess I'm just bored. Anyhow.... getting a model from Maya into Source is the worst experience of your life. Things that can't go wrong will, and your computer will crash once you get it all right. So this is less of a tutorial and more a crying diary of all my past experiences with MDL files, VMFs, and the bouts of suicide that follow seeing your model with a purple and black checkered texture applied on it.
To begin, I'll need to explain the directory system. I'll discuss how to operate while working on a mod. The main folder where you will store your models should be named
[mod_name]_src. The
"_src" part is the important thing. Below is the entire directory structure.
Code:
sourceforts_src/
...mapsrc/
...materialsrc/
......models/
...modelsrc/
The folder must be located in the same root as your actual mod directory. So for me, it would be...
Code:
C:\Program Files\Valve\Steam\SteamApps\SourceMods\sourceforts_src
My actual SourceForts mod folder would be that same path, minus the "_src" on the folder name. The rest is pretty self explanatory. Material source for actual TGA texture files, model source for your Maya scene files... etc. With the directory structure in place, you'll want to create a new project in Maya. Go to
File->Project->New.
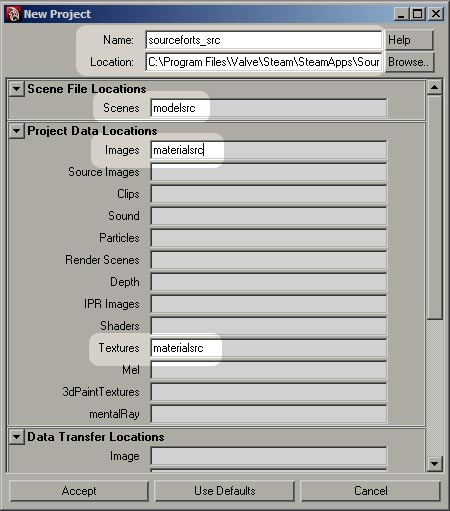 The New Project options box.
Fill in the values as seen above. Once done hit
Accept. With the project created, we need to change some options to better fit how Source works. The most obvious is that Source works in a Z-Up world. Maya uses a Y-Up environment. Go to
Window->Setting ad Preferences->Preferences. The options box will appear. Hit
Settings on the right and tick
Up Axis: Z. Also, make sure that the Linear units is set to
Inches.
Now that everything is set, we need to get the actual exporter. I use Prall's fairly publicized exporter which you can
download here. Extract the files into your Maya user folder as you world any other scripts.
Once extracted, restart Maya. You may or may not receive a notification asking about some shelf scripts. Just ignore it. The buttons are nice, but in no way needed. To ensure that the scripts are installed correctly, check that you have the following options in your
File-> menu.
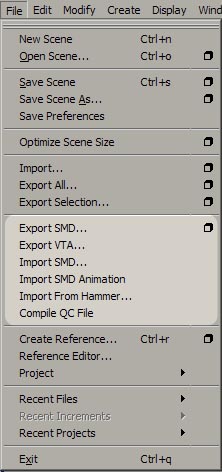 The exporter commands.
With the exporter installed we're ready to prep our model. Open up whatever you want to export. First we need to create a physics mesh. This involves create a very low resolution outline of our model. See below for one I created for a light model I have.
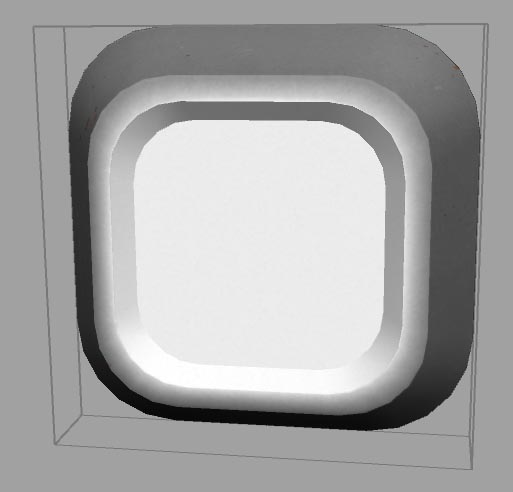 A model and physics mesh.
The wireframe you can see around the model is the physics mesh. Basically nothing more than a cube. You'll want to keep your physics mesh as simple as possible to avoid compiling errors and such. From my experience I've noted that physics meshes can be made up of multiple independent objects that overlap. Just make sure that you combine all of the objects into one mesh before compiling.
You need to apply a texture to the physics mesh, so create any type of shader, hook up the color attribute to a file texture and browse for a random bmp or tga. The texture doesn't matter and won't affect the outcome of your physics mesh.
Finally, we need to smooth the normals of our physics mesh to 180 degrees. Select the final physics object and go to the
Modeling / Polygons menu set. The hit
Normals->Set Normal Angle. Use 180.0 as the angle and hit OK. I'm not actually sure why this is necessary, but it is... so do it.
The next step is to create LODs. This is optional, but it's always nice to include them for performance reasons. LODs are lower resolution versions of your mesh that appear as the player walks further from the object. I've got two for my light model.
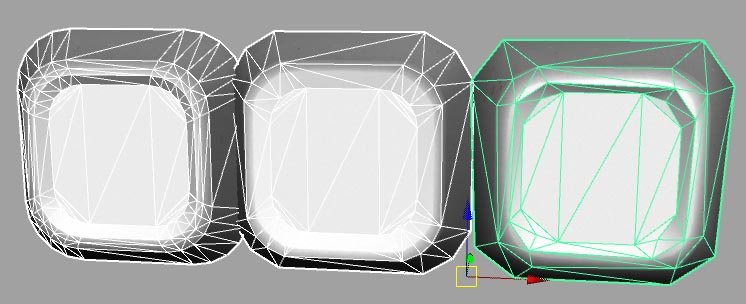 The LODs for my light model.
In the above picture all of my LODs are in a line but in reality you'll need them to overlap each other or else when the model switches to an LOD the LOD model will appear slightly off center of the original.
Naming is going to be important for our models. Name the actual base model
"reference". Name the physics mesh
"physics", and name the LODs
"lod_[number]", where [number] is the order you want your LODs to appear. lod_1, lod_2, and lod_3 are the available options. lod_1 would appear first followed by 2, then 3.
We'll need our textures to be applied correctly to our model. Models require a
Phong E shader with a TGA texture applied to them. You should apply the same shader to your LODs unless they will have different textures. Store the actual texture file in a folder named
"models" in your
materialsrc folder. This is where the exporter will look when trying to convert your TGA.
We're now finished prepping the model. The final step is to set each model on its own layer. The exporter relies on the layer names to decide which mesh goes where. This was a lot easier in earlier versions of Maya. In newer versions I've found layers to be
very finicky. The problem was that the transform node would become a child to the layer, but not the shape node. The exporter relied on the shape node being present in the layer.
I remedied the problem by finding the create layer MEL command and checking it to include the shape node. You'll need to 'install' these scripts now. Go to the right side of your shelf and hold click on the black arrow. click
New Shelf. Fill in something like "Source Exporter" for the shelf name and hit OK.
 The new shelf dialogue box.
Now open your
Script Editor so we can place some scripts on our new shelf. Also, if you haven't already click the shelf tab of your new shelf to make it active. It should be emtpy at the moment.
Once the
Script Editor is open, paste the below script into it.
Code:
select -cl;
select -hi reference;
createDisplayLayer -name ("Reference") -number 1;
Select all of it and hold your
middle mouse button on it. Then drag your cursor anywhere onto your shelf and release. A new icon should appear. Whenever you click this icon it will search for an object named "reference", create a new layer, and apply "reference" to that layer.
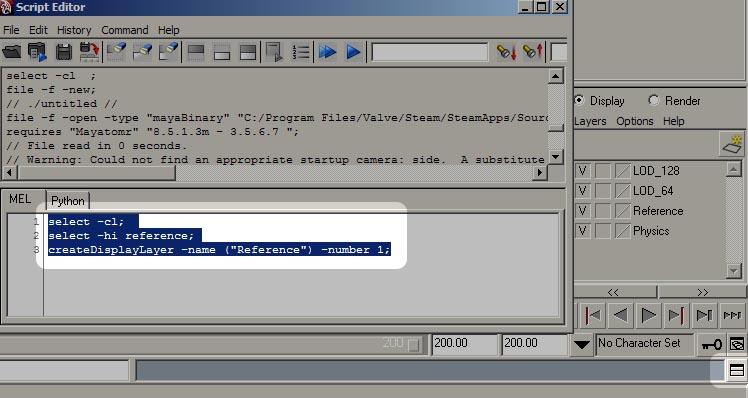 The script editor with the code pasted into it.
Repeat the process for the rest of the scripts seen below. Make sure to clear your script editor each time though, or else you'll apply multiple scripts to one icon.
Code:
select -cl;
select -hi physics;
createDisplayLayer -name ("Physics") -number 1;
Code:
select -cl;
select -hi lod_1;
createDisplayLayer -name ("LOD_64") -number 1;
Code:
select -cl;
select -hi lod_2;
createDisplayLayer -name ("LOD_128") -number 1;
Code:
select -cl;
select -hi lod_3;
createDisplayLayer -name ("LOD_256") -number 1;
Code:
string $nodes[];
$nodes = `selectedNodes`;

editDisplayLayerMembers defaultLayer $nodes[0];
The first scirpt is for your physics mesh, the second, third, and fourth are for any LODs you may have. The last script will take the selected object and essentially remove it from its current layer. Useful if you screw up.

With the layers all set, let's get exporting... maybe. Hit the reference and physics script icons on your shelf to create the layers and apply the objects. Also hit the LOD scripts if you have any LODs.
Time to get exporting. Open up the exporter's options by going to
File->Export SMD... and click on the option box.
 The SMD Exporter options box.
I'll run down the list of the options in the first tab. The first two are self-explanatory. "Freeze and reset transformations" will freeze the transformations on your object and set all of the transformation options like scale, rotate, etc. to 0.
"Combine and smooth collision meshes" will combines all the objects in your physics layer and give them a normal angle of 180.
"Export/compile break models..." will compile any models from the ref_break layers as gibs of your model. I've never had to use this so I don't know the intricacies of it.
I've already gone over exporting LODs.
"Export 1 frame Idle smd" will export an animation SMD of 1 frame where your object does nothing. This is needed for the final MDL compile, so keep it ticked.
"Export Animation smds" is related to the
Animation tab of the exporter.
"Export textures" will attempt to attempt to convert your textures to VTFs. Not always successful.
"Generate qc" will write a pretty decent QC file for you to use when compiling. I suggest ticking it unless you enjoy writing QC files.
"Compile" will attempt to compile your model, but it doesn't seem to work for me.
"Body groups from reference layer" has something to do with groupings and objects, but I've never needed to use it.
"HLMV Thumbnail" will attempt to snap a picture of your model, but this is anequated as the model viewer doesn't use these images anymore.
Onto the next tab. Hit
Path Settings at the top. The paths will probably be empty, so hit the
Default Paths button to fill them in. You may notice a problem once you hit that though. The path will read
"model_sources" instead of
"modelsrc". Just change it so it's correct.
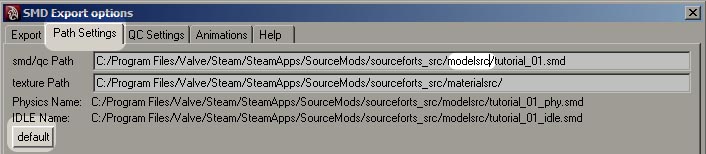 The Path Settings window.
Move onto the
QC Settings tab. Here are a few of the options that will be written into the QC file if you specified for the exporter to write one.
Mass only applies if you uncheck
Static Prop.
Static Prop means that your object will not be a physics object.
Surfaceprop designates how your objects sounds when it gets hit. I've never found what
Keyvalue does. I believe it applies to the gibs though. You can add stuff into your QC file by typing it in the text area.
I won't be going over the
Animation tab because my object doesn't have any animations. Basically all it relies on is you defining frame ranges where your object is performing specific animations.
Hit the
Full Compile button at the bottom of the exporter. You should see a progress window pop up and run through. If you don't then either your layers aren't setup or your scripts aren't working. If yours works like mine, it'll produce the SMD files, but not compile the models. The
Export Only doesn't seem to do anything. Check your
modelsrc folder to ensure that your smd files and QC file are there.
It's getting down to the pit of the process. We've got our SMD files, and our QC file. All we need to do now is compile the parts into a final MDL file. There are a few tools out there to skip the whole command prompt process needed to compile a model, but I'll do you one better. How about a tool that works inside Maya and compiles the model.
Code:
//<?---------------------------------------------------------
//  Purpose: Compile mdl's for Half-Life 2 within Maya.
//  Author:  Stieffers - Stieffers@Gmail.com
//  Version: v1.0.3	Date: 12-15-07
//-----------------------------------------------------------
	/*if ( `window -ex $myWindow`)
	{
		print ( "// Window deleted.\n" );
		deleteUI $myWindow;
	}*/

	string $myWindow = `window -wh 532 118 -t "Compile Model" -s false`;
	columnLayout;
		rowLayout -columnWidth 1 55 -columnWidth 2 20 -columnWidth 3 275 -columnWidth 4 85  -height 23 -numberOfColumns 5 -width 180;
			text -label "Qc Path: " -align "right";
			textField -w 20 -text "C:" text_Qc_01;
			textField -w 275 -enable false -text "\\Program Files\\Valve\\Steam\\Steamapps\\SourceMods\\" text_Qc_02; // Double slashes nessecary.
			textField -w 85 -text "(Mod)_src" text_Qc_03;
			textField -w 90 -enable false -text "\\modelsrc\\" text_Qc_04; // Again, double slashes nessecary.
			setParent ..;
		rowLayout -columnWidth 1 55 -numberOfColumns 2;
			text -label "Qc File: " -align "right";
			textField -w 470 -text "(Filename).qc" text_filename_01;
			setParent ..;
		rowLayout -columnWidth 1 55 -columnWidth 2 20 -columnWidth 3 209 -columnWidth 4 151  -height 23 -numberOfColumns 5 -width 180;
			text -label "StudioMdl: " -align "right";
			textField -w 20 -text "C:" text_studio_01;
			textField -w 209 -enable false -text "\\Program Files\\Valve\\Steam\\Steamapps\\" text_studio_02; // Again, double slashes nessecary.
			textField -w 151 -text "(Email)" text_studio_03;
			textField -w 90 -enable false -text "\\source_sdk\\bin\\" text_studio_04; // Again, double slashes nessecary.
			setParent ..;
		separator -w 532;
		rowLayout -columnWidth 1 100 -numberOfColumns 2;
			button -label "Custom" -al "center" -width 100 -c proc_setSourceForts -aop true;
			button -label "Compile" -al "center" -width 425 -c proc_main;
			setParent ..;

	showWindow $myWindow;

	// Run studiomdl.exe and compile the model.
	proc proc_main ()
	{
		$pathQc = `textField -q -text text_Qc_01`
			+ `textField -q -text text_Qc_02`
			+ `textField -q -text text_Qc_03`
			+ `textField -q -text text_Qc_04`
			+ `textField -q -text text_filename_01`;
		$pathStudio = `textField -q -text text_studio_01`
			+ `textField -q -text text_studio_02`
			+ `textField -q -text text_studio_03`
			+ `textField -q -text text_studio_04`
			+ "studiomdl.exe";

		// Console output.
		print ( "\n-PATHS---------------------------\n" );
		print ( $pathStudio + "\n" );
		print ( $pathQc + "\n\n" );

		// Open a command prompt.
		string $run = `system ( "cmd.exe" )`;
		print $run;

		// Change the directory and then run studiomdl.exe
		string $run = `system ( "dir \"" + $pathStudio + "\"" )`;
		print $run;
		string $run = `system ( "studiomdl.exe " + "\"" + $pathQc +"\"" )`;
		print $run;

		// Finish message.
		print ( "Completed compiling " + $pathQc );
	}

	// Set some of the text fields with default values that correspond with SourceForts
	proc proc_setSourceForts ()
	{
		// Console output.
		print ( "\n-CONFIG: SourceForts-----------------\n" );
		print ( "sourceforts_src\n" );
		print ( "YOUR STEAM USERNAME\n\n" );

		// Update the text field values.
		textField -e -text "sourceforts_src" text_Qc_03;      // Ex: textField -e -text "sourceforts_src" text_Qc_03;
		textField -e -text "YOUR STEAM USERNAME" text_studio_03; // Ex: textField -e -text "Stieffers" text_studio_03;
	}

// Resize the window....
window -e -wh 532 118 $myWindow;
You'll need to fill in your own values near the bottom of the script for your email or username you use for Steam. This is because the MDL compiler is located in...
Code:
C:\Program Files\Valve\Steam\SteamApps\[STEAM USERNAME]\sourcesdk\bin
Once you've got everything set, paste the code in your
Script Editor and run it. The window should appear. Fill in your appropriate values and hit compile. Make sure Steam is running though. Or else it won't work. If you recieve any errors they'll show up in your script editor output area. If all else fails, open up the
Source SDK toolset window and ensure that "SourceForts" is your current config. I believe it defaults to "HL2
M".
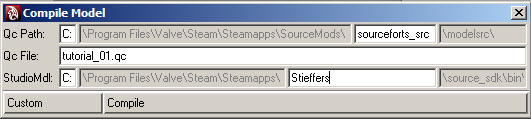 The compiler script.
Your model is now compiled. The only thing missing is the textures. I suggest
downloading this Photoshop VTF plugin. I'm not going to go into detail on how to use it, or go over Source textures in detail. It's not tough though. Just open up your texture, save it as a vtf in your mod's
materials/models folder and enjoy.
The last step is to make sure your model compiled sucessfully. Open up your
Source SDK toolset and then open the
Model Viewer. Hit
File->Open and open your model.. Look at it in all it's wonder.
So, I hope this tutorial helped. Maya and Source aren't very friendly, but they do ocassionaly converse. The problem isn't finding the tools, it's getting them to work. I spent hours trying to import this little cactus I had made. I finally got it working, but there was no texture. I have yet to get that working even after
two years. All I can say is good luck and give me five dollars for writing this tutorial.
Edit: After needing to follow my own tutorial recently, I've discovered some peculiarities. First of all, Prall's exporter no longer seems to work properly when exporting SMDs. The biggest issue was that, even if they did export, they would end up with no data (IE: 0 bytes). If it did work, the SMDs would be 1/4th the size of the physics mesh, which is frustrating. The only solution I've found is to use the default Valve exporter, and individually export each mesh as it's own custom named SMD, and then change the QC file to work with the new filenames.


 Threaded Mode


